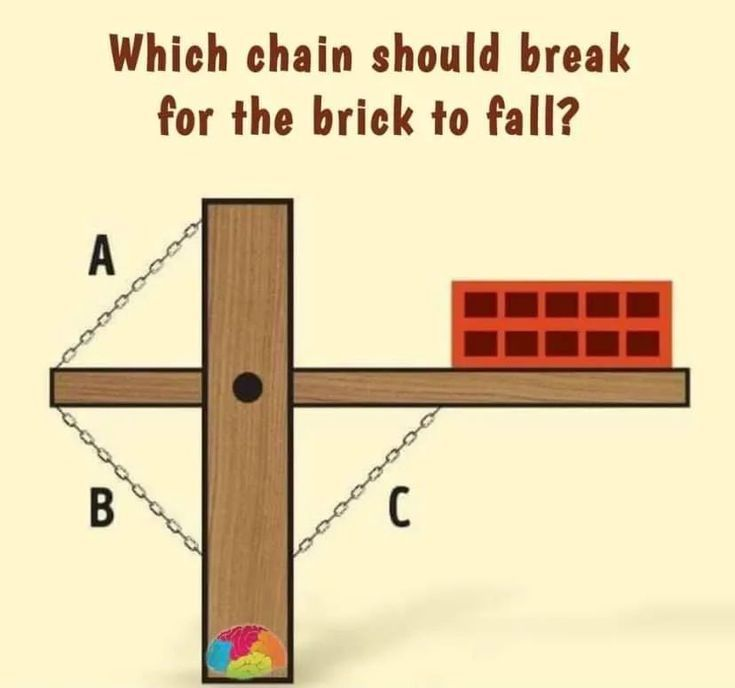
Imagine you’re looking at a simple physics problem where a brick rests on the right side of a horizontal wooden bar. The bar is held in place by three chains: A, B, and C. The challenge? Determine which chain needs to break to make the brick fall. It might seem tricky at first, but once we break it down, it becomes crystal clear.
Analyzing the Setup: A Matter of Tension and Compression
To make sense of the problem, let’s examine how the brick’s weight affects the setup. The brick, positioned on the right side of the horizontal wooden bar, exerts a downward force due to gravity. This force creates a tilting moment that influences the tension and compression in the chains.
Chain C: The Compression Factor
Chain C is located below the right side of the horizontal bar, directly under the brick. You might think breaking Chain C would cause the brick to fall, but that’s not the case. Why? Because Chain C experiences compression, not tension. It’s like pressing down on a spring – it doesn’t pull apart; it pushes together. So, even if Chain C breaks, the brick remains in place.
Video: GUESS the FOOD by EMOJI
Chain A: More Compression
Now, let’s look at Chain A, situated on the left side of the horizontal bar. This chain also experiences compression because the bar pushes down on it. Similar to Chain C, breaking Chain A won’t change the position of the brick. The bar remains stable, and the brick stays put.
Chain B: The Game-Changer
Chain B, however, is positioned below the left side of the horizontal bar and is the crucial piece in this setup. Unlike Chains A and C, Chain B is under tension. Think of tension like stretching a rubber band – it pulls tight. If Chain B were to break, the left side of the bar would tilt upward due to the imbalance caused by the brick’s weight on the opposite side. This upward tilt would cause the brick to lose its balance and ultimately fall.
Why Breaking Chain B Makes Sense

The fundamental reason Chain B needs to break lies in the physics of torque and balance. The brick’s weight on the right side of the bar creates a clockwise rotational force. Chain B’s tension counteracts this force. If Chain B snaps, the left side of the bar rises, and the brick, with nothing holding it steady, falls.
Visualizing the Dynamics: How the Bar Reacts
Picture a seesaw with a heavy weight on one end. The opposite end is secured with a tight rope (like Chain B). If the rope snaps, the weighted end crashes down, while the other end rises. The same concept applies here. Chain B breaking disrupts the equilibrium, causing the brick to fall.
Why Chains A and C Fail to Do the Job
It’s essential to understand why Chains A and C are ineffective when it comes to dropping the brick. Since both are under compression, their role is to stabilize the bar, not to counteract the downward force exerted by the brick. Removing either chain wouldn’t affect the bar’s balance enough to make the brick fall. The bar might wobble a bit but would ultimately remain in place.
The Takeaway: Chain B is the Answer
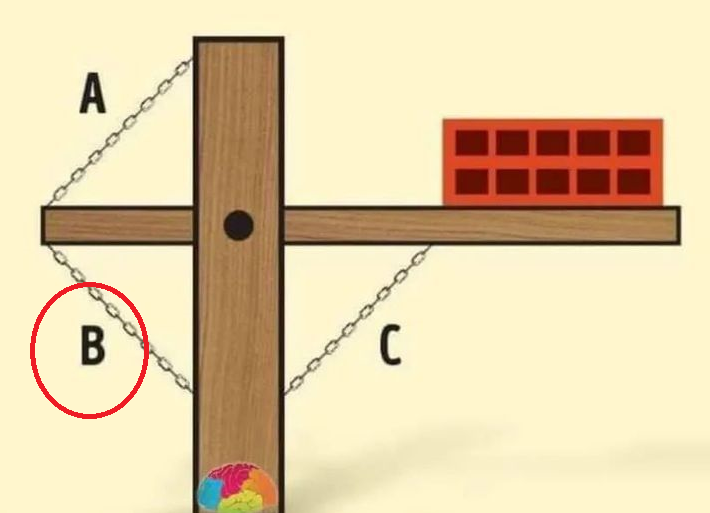
When analyzing this problem, remember the key difference between tension and compression. The chain that’s pulling (under tension) is the one responsible for maintaining balance against the weight. Chain B’s tension is the only factor keeping the brick securely in place. So, if you’re ever faced with this setup in real life or on a brain teaser, you now know that breaking Chain B is the way to make the brick fall.
Conclusion: Physics Made Simple
Sometimes, understanding a problem boils down to identifying the forces at play. In this scenario, it’s all about recognizing which chains are pulling versus pushing. While Chains A and C merely stabilize the structure, Chain B actively fights gravity’s pull on the brick. Break Chain B, and the balance tips, sending the brick tumbling. It’s a classic lesson in torque, tension, and the surprising ways physics influences everyday situations.


